Congratulations on your new Owltron security camera and being part of the Owltron family! This blog post will walk you through setting up and using your camera. We'll cover everything from connecting the camera to your Wi-Fi network to installing your camera. (This is a universal instruction for all Owltron cameras both outdoor and indoor.)
Contents
Prepare Things You Will Need
To embark on a successful journey with your Owltron security camera, it's important to have a few essential items at your fingertips:
-
The Owltron App.
Begin your Owltron security camera journey by downloading the Owltron App, available for both iOS and Android devices. This intuitive mobile application will be your trusted companion, offering seamless access to manage and explore the remarkable features of your camera. -
A 2.4GHz Wi-Fi network.
To ensure optimal performance and seamless connectivity, make sure you have a stable and secure 2.4GHz Wi-Fi network readily available. This network frequency is specifically required for your Owltron security camera. Rest easy knowing that a reliable Wi-Fi connection forms the foundation of your camera's functionality. -
An Owltron App account.
Enhance your control and peace of mind by creating a registered Owltron App account. This step enables you to securely access and manage your camera from any location. By fostering a sense of reassurance and convenience, your Owltron camera becomes an integral part of your daily life, effortlessly keeping an eye on what matters most. -
Installation accessories.
If you plan to install your Owltron camera outdoors or mount it on a higher wall, rest assured that we've got you covered. Along with your Owltron security camera, we have included a set of installation accessories in the package, including screws, anchor holders, and brackets. These tools will assist you in securely mounting your camera in the desired location. Additionally, please ensure you have a driller and hammer on hand for the installation process, which will help you create the necessary holes and secure the camera in place, ensuring a stable and reliable installation. By leveraging these provided tools and your own equipment, you can achieve a secure and customized installation, optimizing the camera's coverage and effectiveness for enhanced security.
Ps: Remember, our dedicated customer service team is always here for you, ready to lend a helping hand and provide guidance should you encounter any concerns or challenges during the setup process. Your satisfaction and peace of mind are our utmost priorities.
Setup the connection & installation
Setting up your Owltron security camera and connecting it to your Owltron App account is a straightforward process. Let's walk through the steps together:
Step 1 Prepare your account
Before starting, make sure to turn on Bluetooth on your mobile device. Then, open the Owltron app and log in to your account, ensuring a secure 2.4G Wi-Fi connection.
Step 2 Configuration network
First off, On the app's home page, locate and select the 'Add Device' option. Choose the corresponding device icon for your Owltron security camera model. Next, you'll need to activate the camera and configure your Wi-Fi information by following the instructions on Owltron App. Power on your Owltron camera and use the camera's built-in scanning feature to scan the QR code displayed on your phone. This establishes a secure connection between your camera and phone. Ensure that the camera's lens is aligned with the QR code on your phone's screen(distance between 15-20cm) for a successful scan.
Step 3 Adjust Settings
Once you have successfully connected your Owltron security camera to the Owltron App, take a moment to explore the various settings available. Customize your camera's behavior to suit your preferences and needs. Within the app, you can adjust settings such as motion detection sensitivity, notification preferences, recording modes, and more.
Step 4 Testing camera
After adjusting the settings, it's essential to test the functions of your Owltron camera to ensure everything is in working order. Start by checking the live video feed to confirm a clear and stable image. Explore additional features such as two-way audio, night vision, and remote pan/tilt capabilities, if applicable. Verify that the motion detection feature triggers timely alerts and that you receive notifications as expected. You can also explore other features by checking our relevant blog posts.
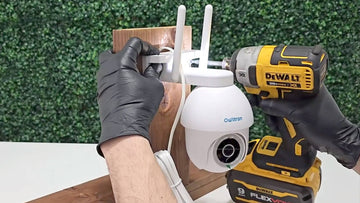
Step 5 Install camera
For outdoor installation, identify a suitable location that provides a wide field of view and covers the desired monitoring areas. Ensure the camera is protected from direct sunlight and harsh weather conditions. Using the included screws, anchor holders, and brackets, securely mount the camera on a sturdy surface, such as a wall or eave. Adjust the camera's angle and direction to achieve the best perspective for surveillance.
For indoor installation, select a strategic location that covers key areas of interest within your premises. You can either place the camera on a flat surface or use the included bracket for wall or ceiling mounting. Position the camera at a height and angle that captures the desired field of view. This ensures comprehensive coverage and maximum effectiveness.
If you have any questions or encounter any difficulties during the setup process, our dedicated customer support team is here to assist you 24/7. You can contact us at support@owltroncam.com or utilize the Owltron app's online chat service for quick assistance.
Find Tips and FAQs
To help you make the most of your Owltron camera and address common queries, here are some related tips blogs and frequently asked questions:
Top searching blogs:
- How to Add Your Owltron Camera to Home Management?
- How to Troubleshoot My Owltron Camera?
- How to Set Up Motion Detection and Tracking?
- How to Authorize and Deauthorize Your Owltron Camera to Google Home?
To explore more features and tips, you’re free to join Owltron Community or sign up for our newsletter.
Top FAQs:
Q: Can the device be connected to the public network?
A: Only public networks that log in with a fixed password can connect to our device, while public networks that log in with an account and password or verification code cannot connect to our device.
Note: To protect your privacy, the security camera is not recommended to use on public networks and networks without passwords for network configuration.
Q: How is a 5 GHz network signal weaker than a 2.4 GHz network signal when penetrating walls?
A: A 2.4 GHz network has better wall penetration performance than a 5 GHz network does. This is determined by the physical characteristics of the electromagnetic wave: the longer the wavelength and the smaller the attenuation, the easier it is to penetrate obstacles. 5 GHz signals have a high frequency and a short wavelength and 2.4 GHz signals have a low frequency and a long wavelength. Therefore, 5 GHz signals have larger attenuation through obstacles and poorer wall penetration capabilities than 2.4 GHz signals. Therefore, most smart devices do not support 5Ghz networks.
Q: What should I do when my device fails to enter the network configuration state?
For more FAQs, feel free to check on our FAQ page. You can easily find questions and answers familiar to yours by simply using the search bar or choosing a specific category. What’s more, If you have any questions during the whole process, You’re welcome to contact us at support@owltroncam.com or utilize the Owltron app's online chat service for quick assistance.
In conclusion, setting up your Owltron security camera is a seamless process. Personalize your settings, test the camera's functions, and install it with ease. Our customer support team is ready to assist you or join our community for further help. Enjoy the peace of mind that Owltron brings to your security needs.